How to wire a subpanel in a detached garage. Installing a sub-panel in a detached garage is the perfect way to make it convenient to turn the electricity off and on when needed.
A sub-panel or breaker box, as it is sometimes called, makes it possible to shut the power off in the garage when you need to.
The first thing you’ll want to think about is how much power you’ll typically use while working in your garage.
If you’re running welders and compressors that require high voltage, then you will need a 100-amp sub-panel.
On the other hand, if you are using smaller equipment like drills and drills, then most likely, a 50 to 60-amp sub-panel will be sufficient.
The most common outbuilding sub-panels, however come with 60 amp breakers in mind.
How to wire a subpanel in a detached garage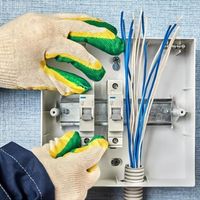
Installing sub-panels is not an easy task. Without proper care, accidents can happen and even the garage itself may suffer severe damage.
Our blog contains a detailed guide to properly installing sub-panels in your garage. We will show you how to install them safely and with as little stress to you and your property as possible.
Obtain and Assemble the Materials
Many people are worried about installing solar panels because they don’t want to run the risk of being caught off guard by any potential problems that may arise.
Before starting out with a project like this one, you should make sure you have everything you need in place before making a move.
Sometimes this includes purchasing additional tools that will help you get the job done safely and easily, like the right kind of screwdriver or a sturdy pair of pliers, for example.
It is much more difficult going into a project without knowing what the challenges will be, so it’s absolutely crucial that you invest your time beforehand, thinking about all possible obstacles that might come up and how you plan to deal with them as best as possible.
Choosing the Right Location
If you are considering installing sub-panels, it is important to determine the placement for them. Usually, a subpanel is installed on an exterior wall of the structure or utility building.
In order to install a sub panel in your garage, you must first determine where you want to place it.
If you’re looking to install a subpanel near the garage, there should be another main panel installed at an accessible location outside.
The main panel is usually located by an entrance, and it can be accessed without having to enter the garage itself.
When only installing one subpanel (as opposed to several), the main panel will take care of the majority of electrical needs.
This allows one to operate light and power outlets located above each parking space within your garage with relative ease, especially if you have them all directly wired into one outlet, such as what would normally be found inside your house as an example.
Disconnect the Main Panel Power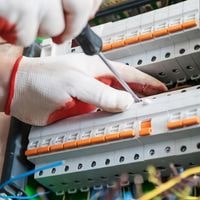
The first thing to do is to turn off the main panel since you will be doing work on the power grid, and that could be dangerous if you don’t know what you’re doing.
Never do anything that you feel is either average or below average because that could very well end in a disaster for yourself and others.
Installing the Sub-Panel
Once you’ve figured out exactly how much space you’ll need for your custom garage sub-panel and have disconnected the main circuit breaker panel from the service panel, it’s time to start installing your own electrical sub-panel.
First, connect a piece of pipe between the corners of your wall and the main circuit breaker panel.
Next, run some wires through the pipe that will be connected to the electric outlet outlets once everything is installed in its final location.
Lastly, make sure that everything is secured well at each end with PVC glue or caulk, and make sure to cap off any exposed wires so they don’t come into contact with anything before fully securing them with wire nuts.
Now, after buying a metal cover for your sub-panel box, tile it into a secure position on one side corner of your wall by fixing the panels of cement beside it.
Activate the Main Panel
You can now be sure the subpanel is connected and powered because you’ve tested to see that all of your connections are working properly.
By switching the main panel on or off, you’ve seen to it that the subpanel is receiving power, which means it’s finally time to perform the last step, which will be attaching the wiring to the electrical box in your garage.
Conclusion
In order to install a subpanel in your garage, it is important to turn off the main power supply. If you do not know how to do so, you can use a small screwdriver and turn off one of the major switches.
The other related task is to find a large enough box for your subpanel by checking out local hardware or services stores. You may buy anything that you feel is necessary and install the new electrical service panel.
It is best if you keep all of these details in mind because installing electrical components might be done only by trained electricians.
How to wire a subpanel in a detached garage
Related Guides