How To Remove Recessed Faucet Aerator Without Key. It’s a basic stream aerator if your water comes out of a faucet with fine bubbles and you can see the aerator at the end of the spout.
This type of aerator is completely visible on the end of your faucet spout, and all you need to do is remove it to perform any minor repairs.
If you’re working on a Delta aerator, instead of using a wrench, use an Allen wrench to detach the valve from the faucet body. These are physically completely different components, even if they look similar.
How To Remove Recessed Faucet Aerator Without Key
Here we show you how to remove the recessed faucet aerator without a key.
Step 1
Most of the time, if an aerator could be unscrewed by hand with a wrench, it will still be possible.
Locate the aerator’s attachment point and remove it from the faucet with a wrench that is preferably plumber’s size. Just make sure you have any reinstallation materials on hand.
Step 2
Place the jaws of a set of vise-grip pliers around the metal to hold it firmly while removing a trapped aerator. Then unscrew it in a counter-clockwise direction with the pliers.
This technique should come in handy if you have a particularly obstinate aerator that refuses to be removed by hand. If not, an extra set of hands and some creative problem-solving skills on your part may be all that’s needed.
Step 3
You can use mild heat to remove the aerator if pliers aren’t working. However, use caution while applying heat to the aerator because it is easy to melt any plastic parts or rubber washers if the aerator is overheated.
The best way to heat up the unit is to use a hairdryer, these tools somewhat expand metal, allowing for better loosening action and preventing the whole thing from suffering too much when you try to loosen and pull it out with pliers. A lit match, on the other hand, can help loosen things up.
Step 4
If you’re having problems unscrewing the aerator, put penetrating oil on the threads and wait a few minutes before trying with pliers.
Before attempting to release the aerator, wipe away any extra oil from around the surface to prevent making it slippery.
Step 5
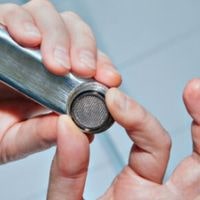
Separate the parts and make a note of their arrangement once the aerator has been removed.
The aerator can have a startling number of small parts, all of which must be reassembled in the same order in order for it to work properly.
With a small stiff brush, remove any grit or other mixed-in residues, and clean away any loose material discovered on the screen or other sections of the aerator assembly with warm water.
If there is a lot of mineral accumulation, immerse the pieces in a lime-dissolving solution overnight.
FAQs
Without tools, how do you remove an aerator?
When the aerator is new, you may be able to unscrew it with your bare fingers, but if it has been used for a while, you will most likely be unable to do so.
To do so, find a towel or a rubber glove that will assist you to gain greater traction and grip while loosening and removing the aerator.
An aerator key is what?
The Danco multi-use aerator key protects the faucet and aerator from damage during installation and removal.
Other tools, such as scratch marks, can harm a faucet, but this key does not make contact with either piece. It was created expressly to address this issue.
Related Guides