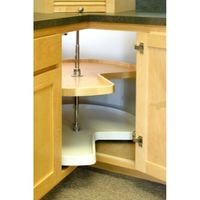
How To Install A Lazy Susan Cabinet. Assume you’re a chef who specializes in using a variety of herbs and spices in your food. A lazy susan might be a terrific way to keep everything on your countertop organized.
After all, I’m sure we’ve all been guilty of allowing our spice cabinets to get disorderly at some point – I’m sure we can all relate to the tangled mess.
Because rotating the top part allows you to get what you need, just when you need it, a lazy susan allows you to have access to whatever you’ll need, right when you need it. But how do you put a lazy susan cabinet together?
How To Install A Lazy Susan Cabinet

Adjusting the cabinet doors on the Lazy Susan. Raising and lowering the doors.
As well as adjusting them when they don’t open or close properly. Screws are tightened and alignment is checked.
We will look at how to install a lazy susan cabinet in this article.
Measuring Size
With the help of a tape measure, determine the dimensions of your lazy Susan base cabinet.
Therefore, you should take identical measurements from the floor where you want the cabinet to be placed and mark the wall accordingly.
Cutting Wood
Make sure that you cut two pieces of wood each an inch smaller than the width of the Lazy Susan cabinet, depending on the size you desire.
Using Stud Finder
The first location to start measuring is along the wall from where the markings were drawn in step one with a stud finder.
Carefully note the exact positions of the studs on the wall using a pencil.
Using Nails
In the second step, use nails to fasten the two wooden squares that were created in the first step to the wall.
They should be aligned underneath the first step’s highlighted markers.
It is critical that they be aligned straight, thus a level should be used to support them. Nails and a hammer are used to secure them to the wall’s wooden studs.
Leveling Cabinet
After the lazy Susan cabinet has been properly installed, it should be pushed against the wall to check that it is level with the case bracket that was previously installed on the wall.
Any faults with plumb, which implies perpendicular to the floor, may be corrected using an instrument like a bubble level or a carpenter’s level. Shims can be used to correct slight differences if necessary.
Screwing Lazy Susan Cabinet

Finally, the cabinet should be fixed to the wood brace that was previously attached to the wall.
Using a drill and screws, the cabinet should be firmly fastened.
It is, nevertheless, a good idea to use at least three screws, so that each side of the cabinet has an equal amount of fastening force.
FAQs
What is the best way to mount a lazy Susan?
With the Lazy Susan mounting hardware, drive a screw through one of the countersunk holes in the top piece, then place it on the bottom using one of the two smaller holes, whichever suits.
All that’s left to do now is insert a screw into the top half via one of the remaining smaller holes for fastening reasons.
What is the proper way to measure for a lazy Susan?
First, determine your minimum cabinet width to ensure your installation will fit. Measure left to right and top to bottom.
Subtract a few inches from each side to ensure that you have enough room for your Lazy Susan before committing to an installation.
Conclusion
A lazy Susan is an excellent purchase that will make your life simpler. However, when it comes to installation.
It’s critical to take extra measures because there are a number of issues that might endanger the entire family, including young children and pets.
I hope that this guide provided a good beginning point for your quest and that you now have the information you need to succeed.
Related Guides