How to fix a lamp socket. It can help you feel like the king of your domain when you fix a burnt-out socket.
Think about what things have in common. Is it an incandescent light or one with LED bulbs?
Next, figure out whether or not you need to get a matching replacement socket if one is available because the physical dimensions will be different otherwise.
Make sure to take the old socket with you to the store so as not to end up getting something that won’t physically fit into place properly.
Once everything has been said and done and after reassembling the lamp, let us know how it all went when you’ve got time! We’d love to hear from you.
How to fix a lamp socket
Upon touching the two probes together, you should see a reading. If the voltage is 120 volts or higher, the plug should work.
The socket is broken and needs to be repaired if there is zero or a significantly lower number than 100.
Ensure the switch is off, remove the bulb and try a new one if necessary, if not, you will need to check whether the circuit breaker or fuse governing the light is tripped.
Disconnect the lamp
Unplug lamp. Unscrew the light bulb. If there are multiple bulbs, remove all of the bulbs that a potential issue could arise with. Go ahead and disconnect the lamp itself from its electrical home base.
Usually this is done by unscrewing what we would refer to as the lamp’s components: make sure you have hold of it first as soon as you unscrew a bulb, make sure it continues to remain steady in your hands until you can place it back on to its go-to spot.
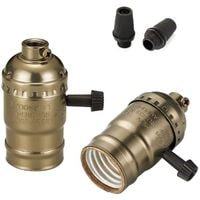
Unplug the socket
The cylindrical metal cover around the socket should be examined.
There is usually a word or phrase on the cover indicating how to grip and remove it (the most common ones have “Press” on the bottom side).
The cover can be removed by pulling it out from the socket base. There may be a cardboard casing in between, which can be removed before removing the cover.
Now grab hold of the electrical fixture with pliers and pull it up such that you will have easier access to its terminals. Loosen each terminal with a screwdriver, making sure not to leave anything behind.
Remove the mounting base of the socket from the lamp. Loosen its setscrew and unscrew it from the threaded rod that the cord runs through.
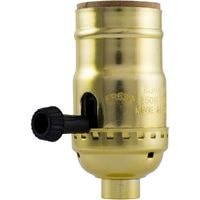
Plugin the New Socket
Unscrew the base of the new socket and thread on the lamp rod while tightening back down. Next straighten the exposed copper wire at the end of each cord wire so that it’s perfectly flat.
Twist all three cords together and wrap them tightly in a clockwise motion, wrapping in such a way that the ridged insulation side is to the left underneath and protected by the silver with an outer covering of smooth insulation covering it entirely.
Next, take only the exposed copper wiring (not any surrounding insulation) underneath and attach it to your silver terminal screw again in a clockwise direction and making sure to tighten firmly using a screwdriver.
Then finally connect your exposed copper wiring(again not any surrounding wires) to your brass threaded terminal screw. And don’t forget to be sure you’ve switched off your power plug!
Replacing the Lamp
Slide a cardboard insulating sleeve over the socket, then insert a socket into the mounting base.
If you can find a metal cover with holes for cords, you can fit it over the cardboard sleeve.
Place a lamp harp on top and adjust the height. Insert a light bulb into the socket. The lamp should then be plugged in and lit.
How to fix a lamp socket
Related Guides